Biscoff Cake
- hungry howe
- Jan 15, 2019
- 3 min read
This is my favourite cake to make for a special occasion, mainly because it's super easy to make and it looks amazing! If I may say so myself.

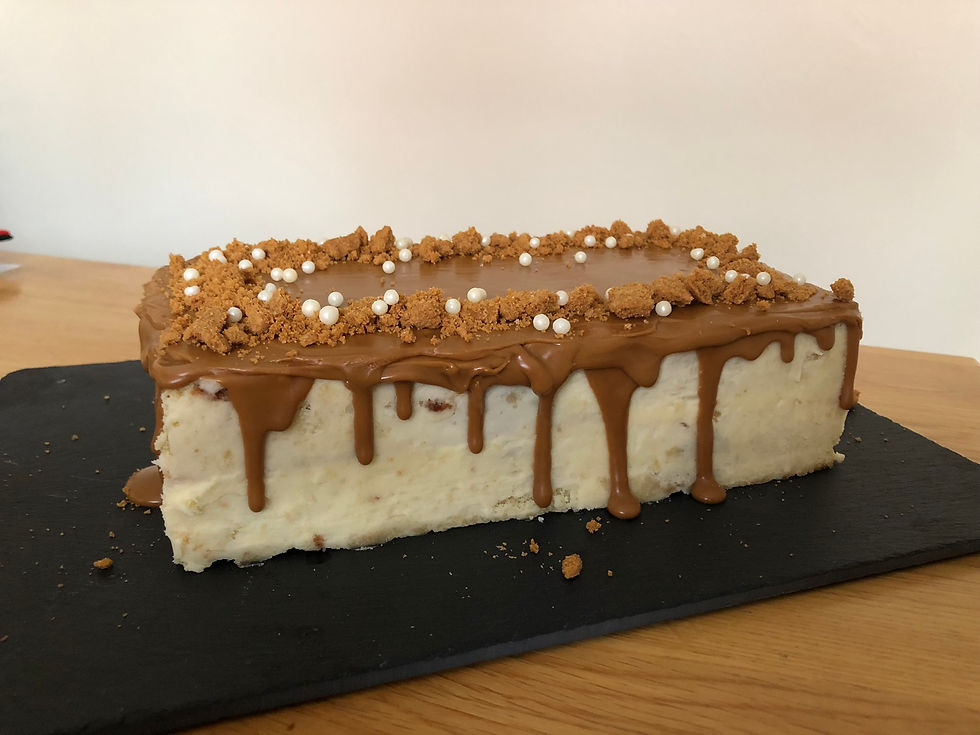
This time I chose to make it in a rectangular shape - mainly because I left my round cake tins at uni - but it looks equally as good in a circular tin. However in a rectangular tin actually made it super easy to slice up and serve when I was eating it.
Notes:
I bake the cake part to the recipe of a classic Victoria sponge cake. A trick my mum taught me was to make all the ingredients in the cake to have the same weight, so that it rises evenly and doesn't turn out too eggy. So I measured out the weight of the eggs without the shells, and that's how I knew how much sugar, butter and self raising flour I needed and hence why they have no measurement in the recipe.
Also the amount of icing I use is very little because I don't like too much over sweet buttercream. It doesn't leave much extra to go wrong, so if this is the first time decorating I would double the amount I use so that you have more to play around with.
Ingredients:
Cake:
3 eggs
Butter
Caster Sugar
Self Raising Flour
Small Packet of Lotus Biscuits (around 12 biscuits) - crushed
Decoration:
50g Butter
100g Icing Sugar
200g of Lotus Biscoff Spread
Recipe:
1. Cream butter and sugar together until light and fluffy. It is essential for it to be lighter in colour as this means the sugar has been mixed in properly. Here I'm using a wooden spoon to do this, but it's much less effort and time if you have an electric whisk.

2. Add in eggs, and try not to over mix as this will cause the mixture to curdle.

3. Fold the flour in as well as about 9 crushed up lotus biscuits - it doesn't have to be fully crushed up, its nice to have some larger pieces as well.

4. Bake at 180 for around 40 mins. Do the toothpick test to make sure that it's ready to take out - it should be fully clean when poked in the middle of the cake.

5. Let the cake cool fully, and then trim the top so that everything is more even. I choose to do this because I like the bottom of the cake to be the top layer as it is flatter and easier to ice. I know I could have the jagged top in the middle but I personally prefer an even layer of icing between the cake, and leaving it bumpy always creates massive pockets of icing, which I don't like. After trimming the top, cut it in half and stack on top of each other and then trim the sides so it has flat sides all the way around.

6. Make the buttercream by first beating the butter until it is pale and creamy. This makes your icing paler and less yellowy. Then gradually mixing in the icing sugar and hoping it doesn't go all over you as you do so.
7. Spread buttercream on one half of the cake, and biscoff on the other side.

8. Stack the cake halves on top of each other and then spread icing all the way around the cake. The best way to get it really flat is an icing knife. It doesn't matter if you can still see the cake peaking through, it adds to the character of the cake, it's supposed to be messy and rustic.

9. I normally put it in the fridge so that it can get cold and I can smooth out the top using a hot knife. I then pour pure biscoff spread on top mainly on the top, avoiding the edges.

10. I then use a knife to push the biscoff down the sides exactly where I want the drips to fall. I find this is the best way to get the drips exactly where I wanted. You then may need to put more biscoff spread on top, to fill in the gaps that may have formed. I then use a hot knife to smooth out the top. Mine turned out a bit messy because I wasn't working fast enough and the layers of biscoff were setting but I actually love the messy nature of the drips, I think it looks more realistic.

11. With the remaining crushed up biscuits I made a border on top of the cake and then added some white icing balls to make it look prettier.
It's delicious!
Thanks for Reading,
Hungry Howe x


Comments